34 min read
Edit pageChapter 8: Build Your Own Astro Integrations
At the end of this chapter, you’ll join the order of mages who wield great power to bend Astro to their will with new functionality and behaviour.
What you’ll learn
- The relationship between Astro and the Vite module bundler
- The different types of integrations available in Astro
- Build your first Astro integration
- Understand the Astro hooks lifecycle
- Deepen your knowledge of building custom Astro feature integrations
Astro and Vite
Before we dive into the beautiful world of Astro integrations, we need to know who’s powering the Astro build ship - and that’s Vite, the build tool all about speed, efficiency and flexibility. Think of Vite as our trusty co-pilot, helping us bundle our web pages and creating a lightning-fast development environment.

To build the custom integrations we’re dreaming of, we may need to go beyond Astro and venture deep into Vite territory, e.g., customising the build step with Vite plugins.
Now, I know this might not be very clear, especially when we start talking about Vite in the upcoming sections of this chapter. But fear not - you now know why Vite is essential to the build process, and I’ll explain with examples in the coming sections of this chapter.
What are Astro integrations
By definition, Astro integrations extend Astro with new functionality and behaviour within your project.
We’ll find ourselves building three types of Astro integrations, namely:
- Renderers: these integrations enable a framework component’s rendering (typically server-side rendering and client-side hydration). Examples of this include the official React, Preact and Vue Astro integrations.
- Libraries: these integrations enable external library support within Astro. Examples of this include the official Tailwind and Partytown integrations.
- Features: these are integrations that extend the behaviour of Astro in a specific way, usually to support a user-defined feature set. Examples include the official sitemap integration that generates a sitemap1 when you build your Astro project.
For most people, the majority of integration you build will be to support a particular feature, i.e., feature integrations. This will be the sole focus of this chapter. Once you have sufficient knowledge of building feature integrations, you can transfer the knowledge to library or renderer integrations.
Let’s get started with a contrived Astro integration.
Hello world. Sorry, Hello, Integration


Let’s get you acquainted with a basic hello world Astro integration. Even though we will be wielding swords and slaying dragons soon, before that, you must get introduced to the tools of the trade.
Project objective
The goal for our first Astro integration is arguably straightforward: we will write a custom Astro integration that automatically logs a hello world message to the browser console on every application page.
Have you got it?
I heard a yes!
Your first custom integration
We will approach this solution by injecting a script on every application page.
How?
Where?
When?
Hold your horses, mate!
Start by beginning a new Astro project with the familiar command:
npm create astro@latest hello-astro-integrationNow that you’re a pro at this name the project whatever you like, e.g., hello-astro-integration and use a minimal (empty) template.
Open the application directory in your favourite director and head over to the astro.config.mjs file.
The astro.config.mjs file includes configuration options for our Astro project. This is where we define integrations for our project, i.e., this is where the magic happens.
At the moment, our astro.config.mjs file should be in the default empty state, as shown below:
// 📂 astro.config.mjsimport { defineConfig } from "astro/config";
export default defineConfig({});
Let’s change that by adding an empty integrations list to the configuration:
// 📂 astro.config.mjsimport { defineConfig } from "astro/config";
export default defineConfig({  integrations: [], // 👀 look here});
In a nutshell, an Astro integration is represented by an object with name and hooks properties, as shown below:
// 📂 astro.config.mjsimport { defineConfig } from "astro/config";
// https://astro.build/configexport default defineConfig({  // 👀 look here  integrations: [    {      name: "astro-hello",      hooks: {},    },  ],});
In the code block above, we’ve outlined the object in the integrations array.
The name of the integration is astro-hello. We’ll discuss hooks in the coming section, but it represents extendable “hook” points within the Astro build lifecycle process.
For example, let’s leverage the first hook in the lifecycle process called astro:config:setup.
This hook is the starting point for the entire build lifecycle. It is triggered on initialisation before Astro has resolved the project configuration. It’s the perfect place to inject scripts onto a new page or extend the project configuration before it’s resolved.
Let’s take advantage of that by passing it into the hooks object and pointing it to a function invoked when the hook is triggered.
// 📂 astro.config.mjsimport { defineConfig } from "astro/config";
export default defineConfig({  integrations: [    {      name: "astro-hello",      hooks: {        // 👀 hook: callbackFn        "astro:config:setup": (options) => {},      },    },  ],});
Note the options parameter in the hook callback. It is an object with the following type definition:
{ config: AstroConfig; command: 'dev' | 'build'; isRestart: boolean; updateConfig: (newConfig: Record<string, any>) => void; addRenderer: (renderer: AstroRenderer) => void; addWatchFile: (path: URL | string) => void; injectScript: (stage: InjectedScriptStage, content: string) => void; injectRoute: ({ pattern: string, entryPoint: string }) => void;}Luckily it contains the injectScript method we’re interested in:
injectScript: (stage: InjectedScriptStage, content: string) => void;stage denotes how the script content should be injected into the page, and there are four possible values 2: head-inline, before-hydration, page, and page-ssr.
The page option will bundle and inject the script with other <script> tags defined in any Astro components on the page. The final output will eventually load this with a <script type="module>.
When I started tinkering with the integrations API, I tried silly things to get injectScript to work. I can confidently tell you these won’t work:
// 👀 Error: Failed to parse source for import analysis// because the content contains invalid JS syntax.injectScript("page", "console.log('Hello World')");
const log = () => console.log("me");// 👀 Uncaught ReferenceError: log is not definedoptions.injectScript("page", "log()");
This saves you the futility I experienced until I looked in the Astro source code.
The content string parameter in injectScript refers to an import path. This is as shown below:
import { defineConfig } from "astro/config";
// https://astro.build/configexport default defineConfig({  integrations: [    {      name: "astro-hello",      hooks: {        "astro:config:setup": (options) => {          //  👀 "page" option with an import path          options.injectScript(            "page",            `import '/src/scripts/  globalLog.js'`          );        },      },    },  ],});
Since we’re passing an import path to the script, let’s ensure the script exists.
Create a new script with the following content in src/scripts/globalLog.js:
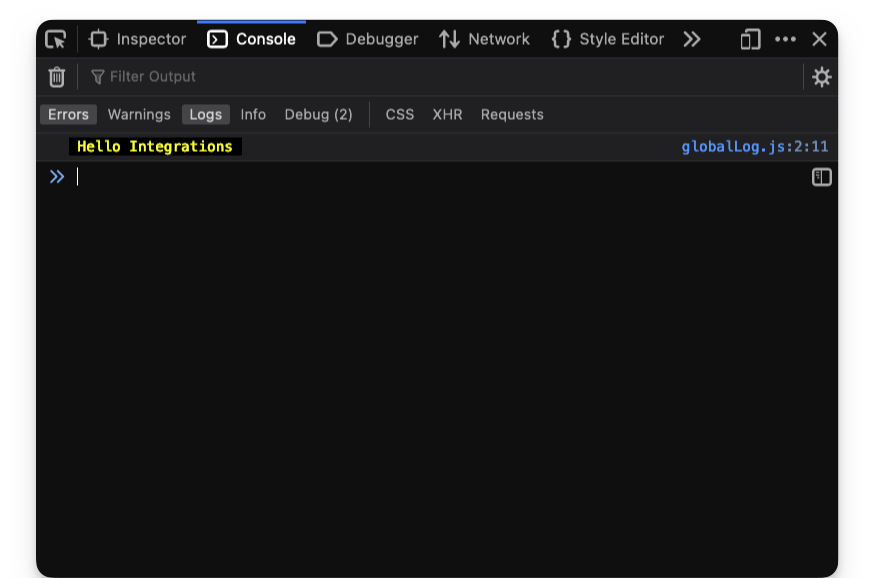
// 📂 src/scripts/globalLog.jsconst logger = () => {  const msg = "Hello Integrations";  console.log(`%c ${msg}`, "background: black;  color: yellow");};
logger();
The logger method calls the console.log method with a Hello integrations string while adding some colour3 to the message.
And voila!
We have our first integration running as expected.
We may create more pages, and the console message will be logged on every page in the application.
Printing a message to the server console
Since we have hook points into the Astro build process, it is also possible to output logs to the server console.
This may be useful for usability or ascertaining that our custom integration works as expected.
At the moment, here’s the mess my server logs look like:
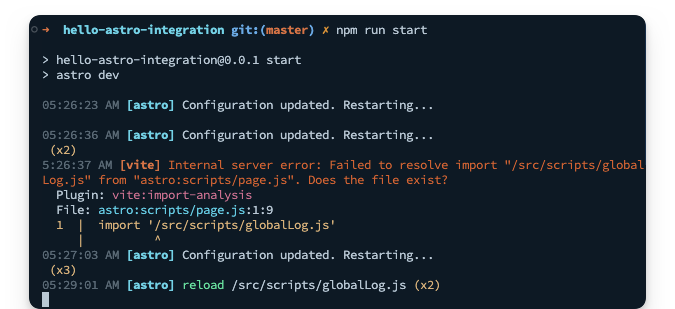
Yours should look familiar. This is from the incremental process of building our first integration.
Let’s go ahead and print something to the logs once we’ve successfully injected our script onto the page.
// ...
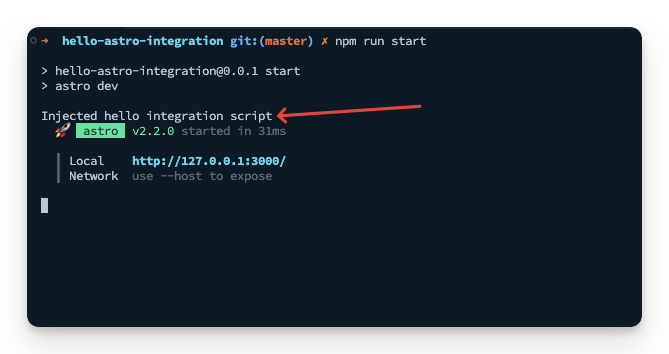
hooks: { "astro:config:setup": (options) => { options.injectScript("page", `import '/src/scripts/ globalLog.js'`);
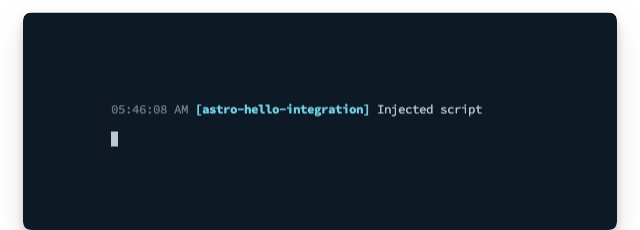
// 👀 add a new log console.log("Injected hello integration script"); },},Restart the server for a clean slate, and we should have the log printed as shown below:
Since we’re fancy developers who care about usability, let’s go ahead and make the log feel native to other Astro logs by adding some text formatting and colour via kleur.
Install the kelur package:
npm install kleurOnce the installation is complete, we should now have a new log in the dev server that reads:
05:41:02 AM [astro] update /package-lock.json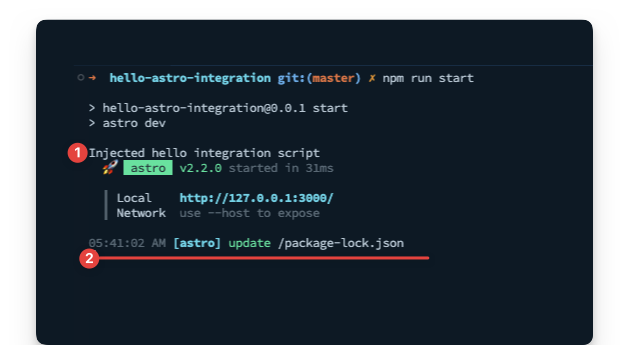
05:41:02 represents my current time.
Please do not ask me why I’m writing this chapter so early in the morning.
Let’s go ahead and make our log look similar. Instead of just using console.log, let’s introduce a logServerMessage that does our beautiful bidding as shown below:
// 📂 astro.config.mjs
import kleur from "kleur";import { defineConfig } from "astro/config";
// 👀 The Intl.DateTimeFormat object enables language-sensitive// date and time formatting.const dateTimeFormat = new Intl.DateTimeFormat([], {  hour: "2-digit",  minute: "2-digit",  second: "2-digit",});
const logServerMessage = (message) => {  // 👀 Get a new date string using the dateTimeFormat object  const date = dateTimeFormat.format(new Date());
  // log to console with kleur colours and formatting  console.log(`${kleur.gray(date)} ${kleur    .bold()    .cyan("[astro-hello-integration]")} ${message}  `);};
export default defineConfig({  // ... same content as before});
Now we should have a beautiful log message that feels native to Astro, i.e., like the other server console logs.
Custom integrations as factory functions
Our current implementation is beginning to clog the Astro configuration file.
In practice, Instead of inlining our custom Astro integration, it’s likely to live in a separate file as a factory function, i.e., a function that creates and returns the Astro integration object.
Let’s do that, i.e., something of a refactor.
Move the entire integration content into a new src/integrations/astro-hello.ts file.
// 📂 src/integrations/astro-hello.tsimport kleur from "kleur";
const dateTimeFormat = new Intl.DateTimeFormat([], {  hour: "2-digit",  minute: "2-digit",  second: "2-digit",});
const logServerMessage = (message) => {  const date = dateTimeFormat.format(new Date());  console.log(`${kleur.gray(date)} ${kleur    .bold()    .cyan("[astro-hello-integration]")} ${message}    `);};
// 👀 Introduce a default export function that returns the Astro// integration object.export default function helloIntegration() {  return {    name: "astro-hello",    hooks: {      "astro:config:setup": (options) => {        options.injectScript(          "page",          `import '/src/scripts/    globalLog.js'`        );
        logServerMessage("Injected script");      },    },  };}
Now, add in Typescript types:
// 📂 src/integrations/astro-hello.ts
import type { AstroIntegration } from "astro";
const logServerMessage = (message: string) => {  // ...};
export default function helloIntegration(): AstroIntegration {  // ...}
Oh yeah!
Our implementation is coming around nicely.
Now, let’s clean up astro.config.mjs by importing our integration as shown below:
// 📂 astro.config.mjsimport { defineConfig } from "astro/config";import astroHello from "./src/integrations/astro-hello";
export default defineConfig({  // 👀 invoke the imported astroHello function in the list  integrations: [astroHello()],});
And there we have it! A sparkly clean, custom Astro integration.
The Astro hooks lifecycle
By definition, lifecycle refers to the series of changes in the life of an organism. For example, a butterfly starts as an egg, larva, pupa and then a full-blown adult.
Until human cloning becomes available, there’s a decent chance you also started as an infant, toddler, puberty then adulthood. At least, I hope so!
In software, the term lifecycle represents a process’s different stages.
With Astro hooks, we explicitly refer to the stages Astro goes through while building your application pages. This is the process from resolving the Astro configuration setup to spinning up a local server to bundling your pages statically or server-side rendered in production.
The entire process is what I call the Astro hooks lifecycle.
To get productive in developing custom integrations, we’ll need to know where in the lifecycle we need to effect a change or react to.
Hooks are functions which are called at various stages of the build, and to interact with the build process, we leverage the following ten hooks:
astro:config:setupastro:config:doneastro:server:setupastro:server:startastro:server:doneastro:build:startastro:build:setupastro:build:generatedastro:build:ssrastro:build:done
Ten seems like a lot to remember. Good thing it isn’t a dozen hooks (twelve). And you don’t have to memorise these. Instead, understand how they work; you can always refer to the official reference4 when needed.
The when and why of hooks
One of the first questions I asked myself when I started tinkering with astro integrations was when exactly are these triggered, and is there some order of execution to them?
Well, the answer to these lies below, but first, consider the following diagram that depicts the order in which the hooks are executed:
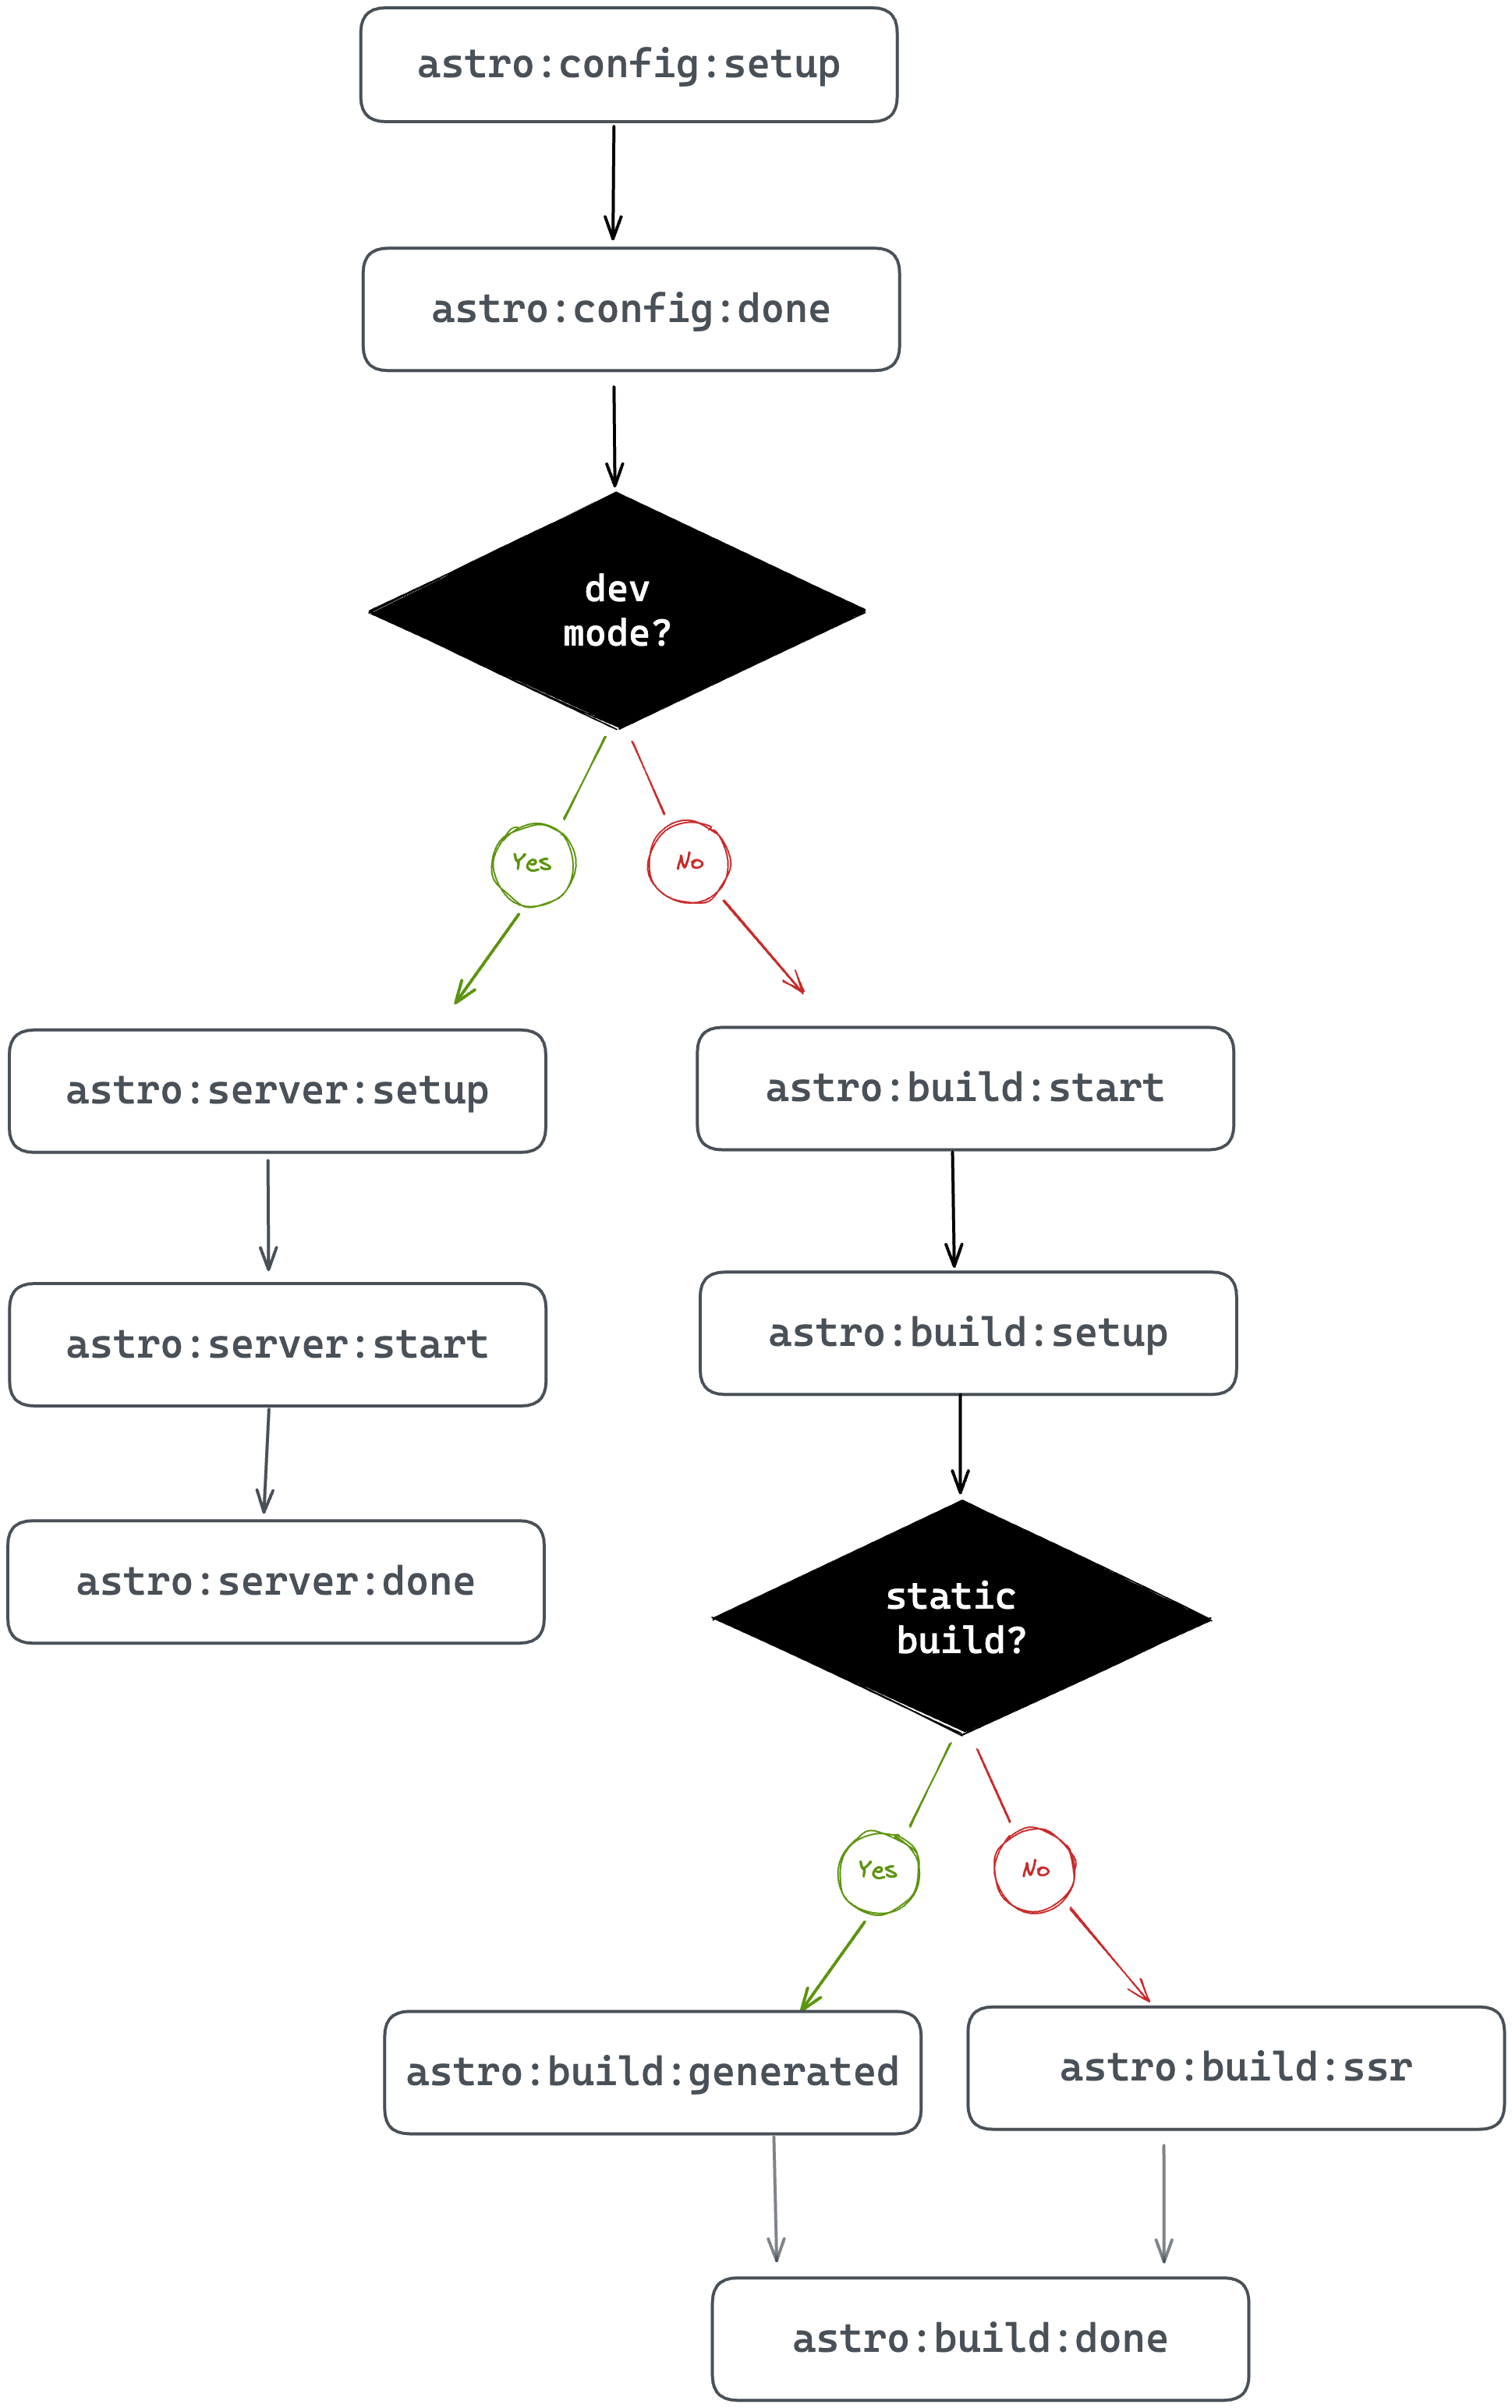
Kicking off the process are two hooks:
astro:config:setupastro:config:done
These hooks are always executed regardless of the Astro build process.
Here’s a breakdown of when these are executed and how we could leverage these in our custom integrations:
| Hook | Executed when … | Why use this … |
|---|---|---|
astro:config: setup | Astro is initialised. This happens before the Astro project configuration (or Vite config) are resolved. | Consider being the first one at the pub before it opens. You can cause a ruckus before anyone else even shows up! Similarly, this is where you swoop in to extend the project configuration e.g., updating the Astro config, applying Vite plugins, adding component renderers and injecting scripts before Astro knows what hit it. |
astro:config:done | The Astro config has been resolved. At this point, every astro:config:setup hook has been invoked for every integration in the project. | Like a perfect pint of beer, we patiently wait to grab the glass only after it’s been poured. Similarly, after the Astro config has finally got its act together and all the other integrations have done their thing, this is where we retrieve the final config for use in our integration. |
Once astro:config:done is fired, there are two branches to consider: development and production mode.
When developing your apps locally, without initiating a production build typically via npm run build or astro build, the left side of the chart depicts the order of hooks execution in developer mode, i.e., the following hooks are invoked:
astro:server:setupastro:server:startastro:server:done
These hooks are executed when building your app for local development.
Here’s a breakdown of when these are executed and how we could leverage these in our custom integrations:
| Hook | Executed when … | Why use this … |
|---|---|---|
astro:server: setup | The Vite server has just been created in development mode. This is before the listen()server event is fired i.e., before starting the server. | This is where we may update the Vite server options and middleware. The Vite dev server object is passed as an argument to our hook. |
astro:server:start | The Vite listen()method has just been fired i.e., the server is running. | Like tech-savvy superheroes, we can jump in here to save the day at the last minute - well, if that involves intercepting network requests. This is where we may jump in to intercept network requests at the specified dev server address (passed as an argument to our hook) |
astro:server:done | The dev server has just been closed. | Like cleaners coming in after the party to sweep up the mess, this is where we run cleanups. If you wish to clean up any side effects triggered during astro:server:setup or astro:server:start, here’s where you do so! |
When we run a production build, two hooks will always be triggered. These are
astro:build:startastro:build:setup
And here’s a breakdown of when these are executed and how we could leverage these in our custom integrations:
| Hook | Executed when … | Why use this … |
|---|---|---|
astro:build: start | The Astro config is completely resolved but before the production build begins. | The production build is about to start but perhaps you want to set up some global objects or clients needed during the build? Here’s where we do so. |
astro:build:setup | The build is just about to get started. At this point, the build config is fully constructed. | To steal the perfect phrase from the official Astro documentation: this is our final chance to modify the build. It’s like getting ready for a night out - we’ve put on our best outfit and look sharp, but we just need to add that one last accessory to complete the look. This is our chance to do just that - to overwrite some defaults and make sure everything is looking top-notch. I must mention that if you’re not sure whether to use this hook or astro:build:start, go for astro:build:start instead. |
Now, depending on whether the page being built is statically generated or to be server-side rendered, either astro:build:generated or astro:build:ssr will be invoked, and finally, astro:build:done.
Yes, you guessed it. Here’s the final breakdown of when these are executed and how we could leverage these in our custom integrations:
| Hook | Executed when … | Why use this … |
|---|---|---|
astro:build: generated | The static production build has completely generated routes and assets. | Access generated routes and assets before build artefacts are cleaned up. As per the official docs, this is an uncommon case and we might be better off using astro:build:done in many cases., except we really need to access these files before cleanup. |
astro:build:ssr | A production SSR build is completed. | To get access to the SSR manifest. This is helpful when creating custom SSR builds. |
astro:build:done | The production build is complete! | This is where we may access the generated routes and assets e.g., to be copied somewhere. For transforming generated assets, consider using a Vite plugin and configuring astro:config:setup. |
Examining the hooks evaluation order
Even though we’ve taken time to explore when the Astro hooks are invoked, there’s no better teacher than practice.
Let’s go ahead and write out a simple integration that spits out a log to the server console when invoked. Then, you can tinker with building several pages for production and inspect the logs.
Our eventual goal is to have a custom integration that looks something like this:
{ name: "some-identifier", hooks: { "hook-name": () => { // log hook name so we know it's been invoked } }}Makes sense?
Let’s go ahead and build this out.
If building along, extend the hello world application or create a new Astro application with the following custom integration:
// 📂 src/integrations/lifecycle-logs.ts
import kleur from "kleur";import type { AstroIntegration } from "astro";
//Create a new dateTimeFormat objectconst dateTimeFormat = new Intl.DateTimeFormat([], { hour: "2-digit", minute: "2-digit", second: "2-digit",});
export const lifecycleLogs = () => { const hooks = [ `astro:config:setup`, `astro:config:done`, `astro:server:setup`, `astro:server:start`, `astro:server:done`, `astro:build:start`, `astro:build:setup`, `astro:build:generated`, `astro:build:ssr`, `astro:build:done`, ] as const;
// base integration structure. "hooks" will be updated let integration: AstroIntegration = { name: "astro-lifecycle-logs", hooks: {}, };
// loop over the hooks list and add the name and log for (const hook of hooks) { integration.hooks[hook] = () => { // 👀 Get a new date string const date = dateTimeFormat.format(new Date());
// log with kleur colours and formatting console.log(`${kleur.gray(date)} ${kleur .bold() .yellow("[lifecycle-log]")} ${kleur.green(hook)} `); }; }
return integration;};
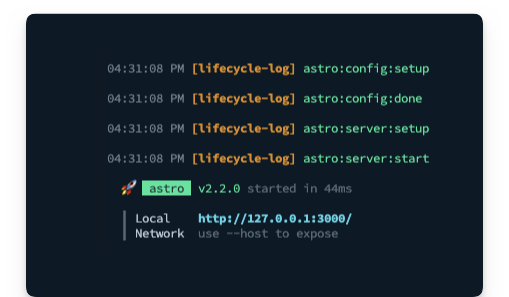
export default lifecycleLogs;Import lifecycleLogs and add it to your project’s integration list, then (re)start your application to see the logs in the console as shown below:
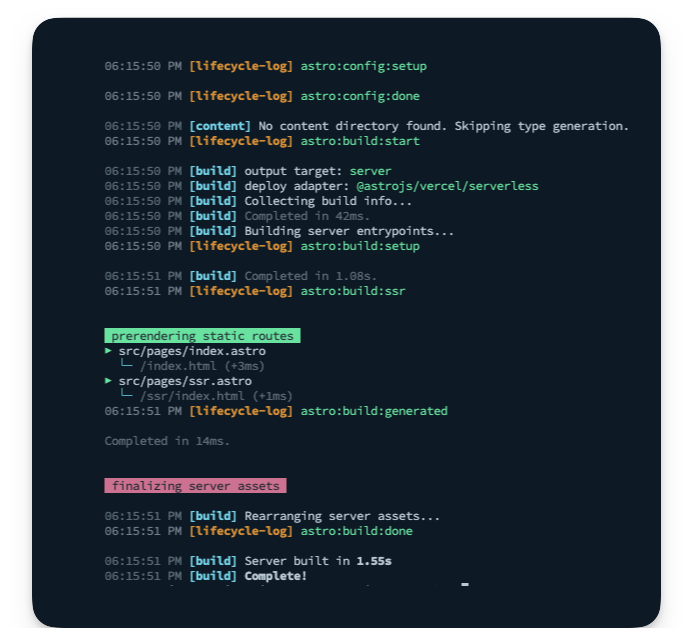
As an exercise, I suggest you add a new SSR page and run a production build to see the order of hooks execution logged.
Here’s an example with two pages:
- a static
index.astropage - a server-side rendered
ssr.astropage
Build a default prerender integration
When we enable SSR in our project, we can also opt-in to prerendering, i.e., to statically render some files at build time.
The way to do this is to add an export const prerender = true to the desired static page(s).
There was a time Astro didn’t support hybrid rendering, so this is an excellent feature.
However, in practice, we may have multiple static pages and just a few server-side rendered ones; adding export const prerender = true to all the static pages gets painfully annoying.
The other day I started building an Astro application predominantly statically rendered, and then I realised I needed one server-side rendered route. At this point, I change my astro.config.mjs file to include output: server. Consequently, I had to go to all the existing static pages to add export const prerender = true. This wasn’t pleasant.
Project objective
The goal of our custom integration is to flip the default hybrid rendering behaviour of Astro.
By default, with an output: server in our configuration, all pages are assumed to be server-rendered, and we must explicitly add export const prerender = true to our static pages.
We want to achieve a different behaviour for cases when we have more static pages, i.e.,
- By default, with
output: serverin our configuration, render all pages statically at build time, i.e., prerender by default. - Add
export const prerender = falseto render a page server-side explicitly.
See what we’ve done there?
Now, please give it a think. How do we achieve this?
At the time of writing, there’s a public roadmap for Astro to support default pre-rendering internally. Until then, let’s bend Astro to our will.
Integration API
We will design our integration as a factory function named prerenderByDefault.
Our users will go ahead and invoke this function within their integrations list, as shown below:
export default defineConfig({ integrations: [prerenderByDefault()],});By default, we will log messages to the server console but expose a silent parameter to prevent server console logs.
Astro integrations usually support configurations by passing arguments to the factory function. Below’s our proposed API:
export default defineConfig({ integrations: [ prerenderByDefault({ silent: true, // or false (boolean) }), ],});Finally, we will add some basic validation within our integration. If the user doesn’t have an output: server or adapter option in their configuration, we will skip pre-rendering by default. This is because we only want our integration to take effect during hybrid rendering, which is only activated with output: server in the user’s project configuration.
Technical solution overview
At its core, our integration will take advantage of two lifecycle hooks: astro:config:setup and astro:config:done as shown below:
export default function prerenderByDefault() { return { name: "astro-prerender-by-default", hooks: { "astro:config:setup"() {}, "astro:config:done"(options) {}, }, };}In astro:config:done, we will retrieve the project’s resolved configuration and perform our validation.
"astro:config:done"(options) {
   // 1. Get resolved config from options.config   // 2. Validate that the config object has the right    //   output and adapter values
}
In astro:config:setup, we will swoop in and extend the user’s Astro project configuration by applying a custom Vite plugin.
"astro:config:setup"(options) { // Apply a custom Vite plugin here}When Astro builds our project, it does so using Vite. Integrations are to Astro what plugins are to Vite. To extend Vite, we use plugins.
We can tap into the Vite build lifecycle to access the user’s Astro code (particularly their pages) during the build process.
Now, here comes the fun part.
First, we will parse the Astro code into Abstract Syntax Trees (ASTs).
Essentially, an AST serves as a means of representing the code’s structure in a programming language. Just as a sentence can be broken down into nouns, verbs, and adjectives, an AST dissects code into its essential components - variables, functions, and operations - and reflects their relationships in a tree-like structure.
A valid Astro component may take different forms; however, the frontmatter must always be the first child node of the root node.
For example, the following is correct:
// frontmatter
// markup goes here<h1> Hello world </h1>
The following is invalid:
<h1> Hello world </h1>
// frontmatter
With this heuristic, we will grab the first child node in the root of our parsed AST and make some decisions:
- If the file already has a
prerenderexport, do nothing, i.e., leave the file as is. - Otherwise, update the code to include
export const prerender = true, i.e., we will update the code within our integration. It’s important to note that this only transforms the page’s code to be built. It does not update the local file. - Finally, if a page has no frontmatter, we will create one and include the
export const prerender = truecode snippet.
Initialising projects via CLI flags
The create astro command is robust. However, sometimes you don’t have the patience to select every option via prompts.
In such cases, use the CLI flags as shown below.
Initialise a new project with the following command:
npm create astro@latest -- --template=minimal--typescript=strictest --git --installastro-integration-prerender-by-defaultThis will set up a new Astro project in the prerenderbyDefaultdirectory with CLI flags passed instead of via prompts, i.e., --template=minimal will use the minimal template, --template=strictest will use the strictest typescript config, --git will initialise a git repo and --install will install the dependencies.
Here’s a quick table of the available CLI flags:
| Name | Description |
|---|---|
--template <name> | Specify the template. Where name could be any of the directories in https://github.com/withastro/astro/tree/main/examples/. |
--install / --no-install | Install dependencies (or not). |
--git / --no-git | Initialize git repo (or not). |
--yes (-y) | Skip all prompts and accept the defaults. |
--no (-n) | Skip all prompts and decline the defaults. |
--dry-run | Walk through the project creation steps without any actual execution. Useful for a “dry run” |
--skip-houston | Skip the Houston animation. If in a hurry, this saves some time and starts the prompt directly. |
--typescript <option> | Where option is strict , strictest orrelaxed |
Now, change the directory and run the new Astro application:
cd ./astro-integration-prerender-by-default && npm run startBy default, this should start the application on an available port, e.g., localhost:3000.
Setting up the integration
Create a new index file in integrations/prerenderByDefault and create the integration factory function as shown below:
export default function prerenderByDefault() { return { name: "astro-prerender-by-default", hooks: { "astro:config:setup"() {}, "astro:config:done"() {}, }, };}Let’s add support for configuring the integration by accepting a configuration object.
Go ahead and create a types.ts file in integrations/prerenderByDefault as shown below:
export type Config = | { silent?: boolean, } | undefined;Now, let’s add a config parameter to the prerenderByDefault factory function and type its return value as shown below:
import type { AstroIntegration } from "astro";import type { Config } from "./types";
export default function prerenderByDefault(config: Config): AstroIntegration {  // ...}
Now go ahead and add the integration in the project’s config file:
import { defineConfig } from "astro/config";import prerenderByDefault from "./integrations/prerenderByDefault";
export default defineConfig({  integrations: [prerenderByDefault()],});
Validating a resolved Astro configuration
Let’s go ahead to handle our integration validation. First, we will create an isValidAstroConfig method to receive an Astro configuration and a validation result.
Here’s the implementation below:
// 📂 prerenderByDefault/isValidAstroConfig.ts
import type { AstroConfig } from "astro";
/** * @param config: the fully resolved astro project config * @returns validation result */export const isValidAstroConfig = (config: AstroConfig) => {  if (config.output !== "server") {    return { type: "invalid_output_config", value: false } as const;  }
  if (!config.adapter) {    return { type: "invalid_adapter_config", value: false } as const;  }
  /**   * configuration is valid   */  return { type: "success", value: true } as const;};
I’ve decided to return an object instead of simple boolean values to utilise typescript’s exhaustiveness checking.
Now, let’s leverage isValidAstroConfig in the astro:config:done hook by doing the following:
- Retrieve the final Astro project configuration
- Validate the configuration
- Log messages to the server console based on the validation result
Here’s how:
export default function prerenderByDefault(config: Config): AstroIntegration {  return {    name: "astro-prerender-by-default",    hooks: {      "astro:config:setup"() {},      // 👀 look below      "astro:config:done"(options) {        // get the 'silent' integration config property, default to false.        const silent = config?.silent ?? false;
        // validate the resolved project configuration        const validationResult = isValidAstroConfig(options.config);
        /**         * Leverage Typescript exhaustive check to handle all         * validation types and log messages where appropriate         */        switch (validationResult.type) {          case "invalid_adapter_config":            log({              silent,              message: `Adapter not set for hybrid rendering. Skipping`,            });            return;
          case "invalid_output_config":            log({              silent,              message: `Config output not set to "server". Skipping`,            });            return;
          case "success":            return;
          default:            const _exhaustiveCheck: never = validationResult;            return _exhaustiveCheck;        }      },    },  };}
We’re calling a log function to write messages to the server console depending on the validation result, but this function does not exist.
We’ve written similar log functions, so here’s the code for this one:
// 📂 prerenderByDefault/log.ts
import kleur from "kleur";
type LogOptions = {  silent: boolean,  message: string,};
const dateTimeFormat = new Intl.DateTimeFormat([], {  hour: "2-digit",  minute: "2-digit",  second: "2-digit",});
export const log = (options: LogOptions) => {  // do not log if the "silent" argument is passed  if (options.silent) {    return;  }
  // get new date  const date = dateTimeFormat.format(new Date());
  // log to the console with colours and text formatting  console.log(`${kleur.gray(date)} ${kleur    .bold()    .magenta("[astro-prerender-by-default]")} ${options.message}  `);};
Now make sure to import the log function in prerenderByDefault/index.ts:
import { log } from "./log";...Now if we go ahead and build the project with npm run build, we should have our integration validation log displayed as shown below:
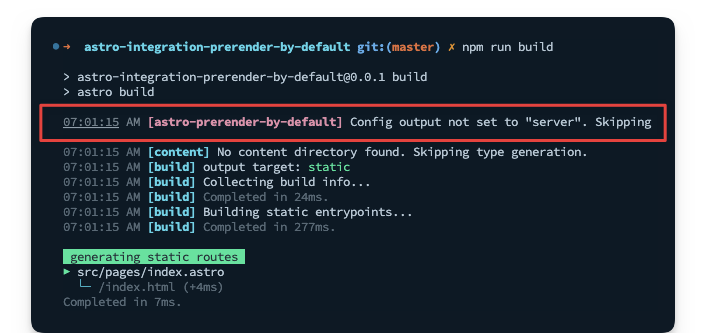
This is expected because the project does not have a server output configured. In this case, hybrid rendering cannot be utilised.
Applying Vite plugins in custom integrations
Astro uses Vite under the hood; as such, it’s possible to pass additional configurations5 to Vite in the astro.config.mjs file, e.g.,
{ vite: { //This adds a custom plugin directly to the Astro config plugins: [myPlugin()]; }}Consequently, we can take advantage of this in our integration.
Remember from the lifecycle hooks section that astro:config:setup is where we may swoop in to extend the project configuration. Let’s do so now:
import { injectVitePlugin } from "./injectVitePlugin";// ...
  return {    name: "astro-prerender-by-default",    hooks: {      // 👀 look here      "astro:config:setup"(options) {        options.updateConfig({          vite: {            plugins: [injectVitePlugin()],          },        });      },}// ...
In the plugins array, we’re invoking injectVitePlugin(), which should return a valid Vite plugin.
Oh, but what’s a valid Vite plugin, you might ask?
Similar to Astro integrations, a Vite plugin is represented by an object with a name property and specific hooks, which are methods on the object, e.g.,
{ name: "vite-plugin-${name}, configResolved() { // Called after the Vite config is resolved }}Let’s go ahead and write out a basic version of injectVitePlugin:
import type { Plugin } from "vite";
export const injectVitePlugin = (): Plugin => {  //Our prerender plugin to be fleshed out  const prerenderByDefaultPlugin = { name: "" };
  return {    // name follows the pattern vite-plugin-${framework}-${feature}    name: "vite-plugin-astro-inject-default-prerender",    configResolved: (options) => {      //Grab the Vite plugins in the resolved config   // and add our plugin as the first in the list      (options.plugins as Plugin[]).unshift(prerenderByDefaultPlugin);    },  };};
We will flesh out this basic structure, but first consider that in the astro hooks lifecycle, astro:config:setup runs before astro:config:done.
We’re updating the Vite plugins in astro:config:setup. However, we’re validating the project config in astro:config:done.
We’ll likely run into a race condition here, i.e., updating the Vite plugin list in astro:config:setup before astro:config:done has wholly validated the project’s config.
How may we resolve this?
Let’s leverage a promise.
We will initialise a promise that’s only resolved after validation is complete, and we will await the promise resolution in injectVitePlugin. Luckily, astro:config:setup can take in async functions. Particularly in the vite plugin function(s).
Let’s walk through the changes required to achieve this.
First, let’s introduce a ValidationResult type in our types.ts file:
// 📂 prerenderByDefault/types.ts
import type { isValidAstroConfig } from "./isValidAstroConfig";
export type ValidationResult = ReturnType<typeof isValidAstroConfig>;
// ...
Now, create a new promise in the main index file:
// ...import type { Config, ValidationResult } from "./types";
let resolveValidationResult: (value: ValidationResult) => void;
let validationResultPromise =  new Promise() <  ValidationResult >  ((resolve) => {    resolveValidationResult = resolve;  });
// ...
Right after validation is done inastro:config:done, let’s go ahead and resolve the promise with the result of the validation:
// ..."astro:config:done"(options) {   const silent = config?.silent ?? false;   const validationResult = isValidAstroConfig(options.config);
   // resolve the validation promise   resolveValidationResult(validationResult);
   // ...}
Then pass both the integration configuration and validation result promise to injectVitePlugin:
// ...plugins: [injectVitePlugin(config, validationResultPromise)],We must now update injectVitePlugin to await the validation result promise as shown below:
import type { Plugin } from "vite";import type { Config, ValidationResult } from "./types";
export const injectVitePlugin = async (  config: Config,  validationResultPromise: Promise<ValidationResult>): Promise<Plugin | null> => {
  // await the validation result promise before continuing  const validationResult = await validationResultPromise;
  // exit if the validation result value is false  if (!validationResult.value) {    return null;  }
  // TBD ..  const prerenderByDefaultPlugin = { name: "" };
  return {    name: "vite-plugin-astro-inject-default-prerender",    configResolved: (options) => {      (options.plugins as Plugin[]).unshift(prerenderByDefaultPlugin);    },  };};
Phew! We’ve eradicated the pesky race condition. So our solution is shaping up nicely, eh?
Writing Vite plugins for Astro
We know what a Vite plugin looks like now. However, the core functionality of our integration hasn’t been written yet. This is currently represented by the prerenderByDefaultPlugin variable, i.e.,
// TBD...const prerenderByDefaultPlugin = { name: "" };Let’s change this to be returned from a separate getVitePlugin function:
// ...import { getVitePlugin } from "./getVitePlugin";
export const injectVitePlugin = async (  config: Config,  validationResultPromise: Promise<ValidationResult>): Promise<Plugin | null> => {  // ...
  const prerenderByDefaultPlugin = getVitePlugin(config);
  // ...};
Where getVitePlugin is the following:
import type { Config } from "./types";
export const getVitePlugin = (config: Config) => ({  name: "vite-plugin-astro-prerender-by-default",});
Parsing and transforming ASTs
We want to transform a user’s Astro code and make updates before it is eventually built.
Luckily Vite has a transform 6 hook we can leverage just for this. Let’s play around with this a bit in our getVitePlugin function:
import type { Plugin } from "vite";import type { Config } from "./types";import { log } from "./log";
export const getVitePlugin = (config: Config): Plugin => {  const silent = config?.silent ?? false;
  return {    name: "vite-plugin-astro-prerender-by-default",    async transform(code, id) {      // 👀 log the value of the id      log({        silent,        message: id,      });    },  };};
The transform hook is ideal for transforming individual modules in the build process, and we receive the code in the file as a string and an id representing the string path to the file name.
To test how this works, update the Astro project config to include a server output.
export default defineConfig({ output: "server", integrations: [prerenderByDefault()],});Then add an adapter to handle server-side rendering with:
npx astro add netlifyWe may now explore the log fromgetVitePlugin by running npm run build from the terminal.
Notice how many more files are transformed than just the user’s .astro pages.
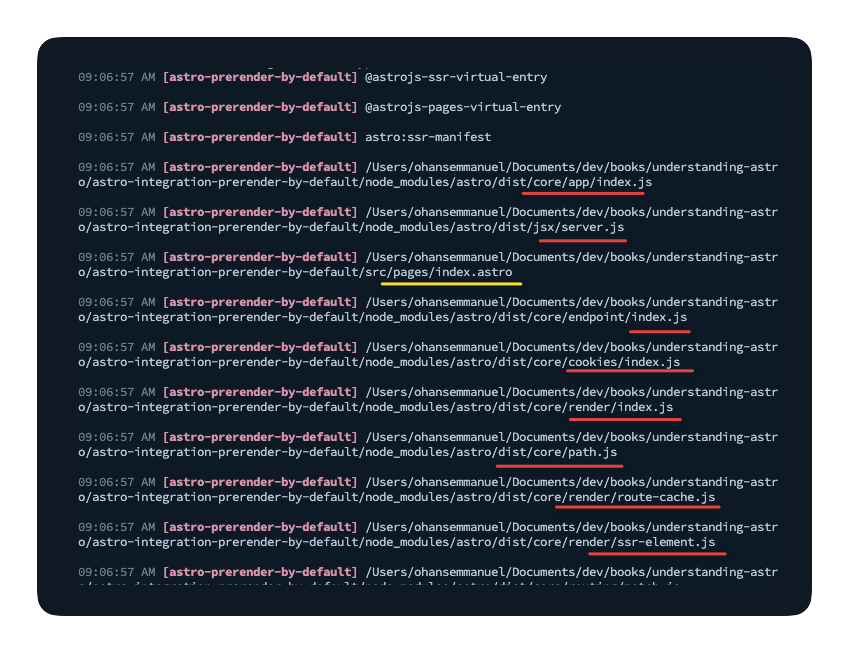
Most of the files here are related to Astro internals. Therefore, we must only concern ourselves with the user’s .astro pages. We want to transform those files while leaving everything else as is.
Let’s add a simple conditional:
// ...return {  name: "vite-plugin-astro-prerender-by-default",  async transform(code, id) {    // 👀 filter out other file types    if (!id.endsWith(".astro")) {      return;    }
    // log the value of the id    log({      silent,      message: id,    });  },};
Now, rerun the build, and we should have just the user’s .astro page files.
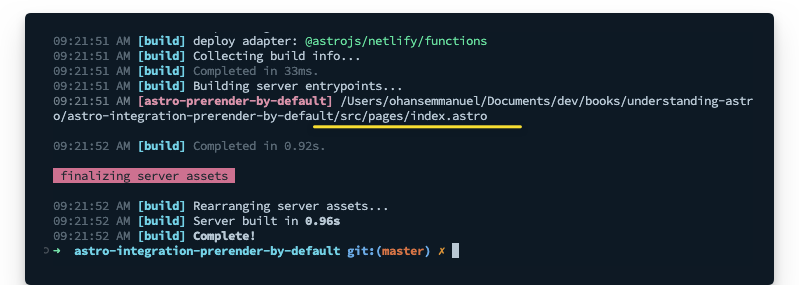
This is excellent.
Just after the conditional, we can get on with parsing the code. To do this, we will leverage the parse utility exported from Astro’s compiler as shown below:
    // ...    async transform(code, id) {      if (!id.endsWith(".astro")) {        return;      }
    // 👀      const { ast } = await parse(code);
      // 👀 logs for debugging      log({        silent,        message: "Parsed AST",      });
      console.log(ast);    }
This project only has a single page in src/index.astro. So, essentially, only that page will be transformed.
Here’s the content of the page:
<html lang="en"> <head> <meta charset="utf-8" /> <link rel="icon" type="image/svg+xml" href="/favicon.svg" /> <meta name="viewport" content="width=device-width" /> <meta name="generator" content={Astro.generator} /> <title>Astro</title> </head> <body> <h1>Astro</h1> </body></html>Here’s the corresponding AST logged to the console:
{ type: 'root', children: [ { type: 'frontmatter', value: '\n', position: [Object] }, { type: 'element', name: 'html', attributes: [Array], children: [Array] }, { type: 'text', value: '\n', position: [Object] } ]}Every parsed AST will have a root element. An empty file will have the shape:
{ type: "root";}Knowing this, we can build out our parsing logic. However, we need a way to walk the entire AST. We could write a sophisticated function to loop over every element in the tree. However, we can leverage the walk utility from the Astro compiler, which will traverse every node in the tree, and we could perform any actions on a specified node via a callback.
Let’s take that for a spin by adding the following:
const { ast } = await parse(code);
// 👀walk(ast, (node) => {  console.log("=========== \n", node);});
Inspect the logs, and we should have the different nodes logged to the console, for example:
=========== { type: 'root', children: [ { type: 'frontmatter', value: '\n', position: [Object] }, { type: 'element', name: 'html', attributes: [Array], children: [Array] }, { type: 'text', value: '\n', position: [Object] } ]}=========== { type: 'frontmatter', value: '\n', position: { start: { line: 1, column: 1, offset: 0 }, end: { line: 2, column: 4, offset: 7 } }}===========// ... see logsIt’s game time. Let’s go ahead and write out the complete code, which involves
- Walking the AST
- Checking if the file has a frontmatter
- Checking if the file already has a
prerenderexport in its frontmatter. For this, we will use es-module-lexer , which outputs the list of exports of import specifiers - Adding
export const prerender = trueto the code where required - After transforming the AST, i.e., adding
export const prerender = truewhere needed, we will return the AST to code via theserializeutility from the Astro compiler.
Here we go:
import type { Plugin } from "vite";import type { Config } from "./types";import { parse } from "@astrojs/compiler";import { walk, is, serialize } from "@astrojs/compiler/utils";import { parse as parseESModuleLexer } from "es-module-lexer";
import { log } from "./log";
export const getVitePlugin = (config: Config): Plugin => {  const silent = config?.silent ?? false;
  return {    name: "vite-plugin-astro-prerender-by-default",    async transform(code, id) {      if (!id.endsWith(".astro")) {        return;      }
      const { ast } = await parse(code);
      walk(ast, (node) => {        if (is.root(node)) {          const firstChildNode = node.children?.[0];
          //Check that a frontmatter exists as the first child node          if (firstChildNode?.type === "frontmatter") {            //Using es-module-lexer, get the list of exports            const [, exports] = parseESModuleLexer(firstChildNode.value);
            //Check if any export is named "prerender". "n" stands for "name."            if (exports.some((e) => e.n === "prerender")) {              log({                silent,                message: "'prerender' export found. Skipping",              });
              // exit - let whatever prerender value is exported take effect              return;            }
            // add prerender export for the static build, i.e., "export const prerender = true."            // note that we concatenate this to whatever the current string value of the node is            firstChildNode.value = `\nexport const prerender = true; \n ${firstChildNode.value}`;
            log({              silent,              message: "Added 'prerender' export to frontmatter",            });          } else {            // No frontmatter in this astro component. Add frontmatter node and default export            log({              silent,              message: "No frontmatter, going ahead to add one",            });
            // "unshift" to add this to the start of the list, i.e., the first child            node.children.unshift({              type: "frontmatter",              value: "\nexport const prerender = true\n",            });          }        }      });
      //serialise the AST and return the result      const result = serialize(ast);
      // added for the reader's debugging      console.log(result);      return result;    },  };};
The code block above is annotated. Please take a close look at it. If something is unclear, add some console.log. Together with the annotation, I’m sure you’ll understand the explanations even better!
Manual testing
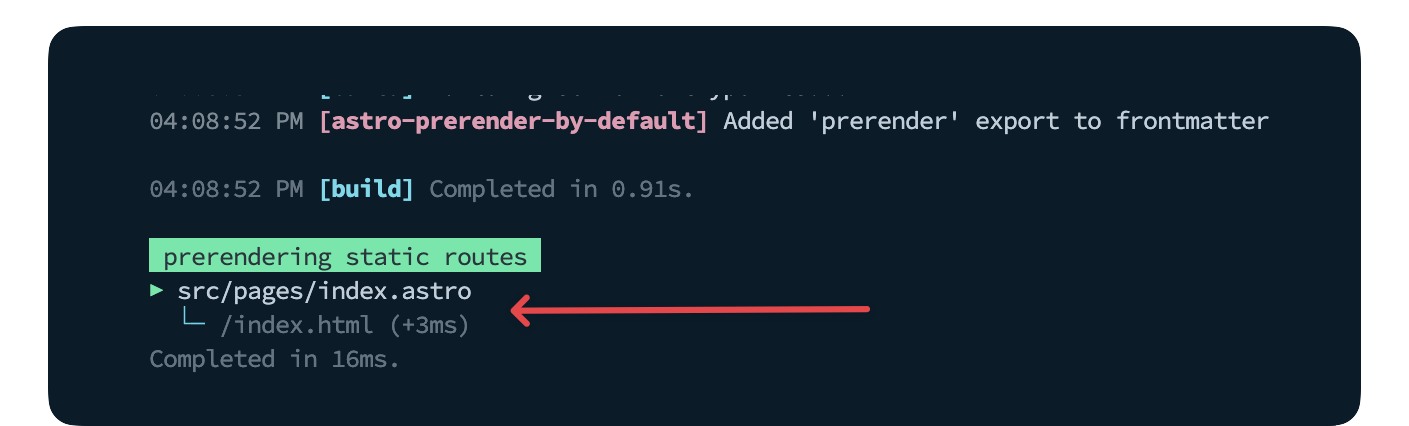
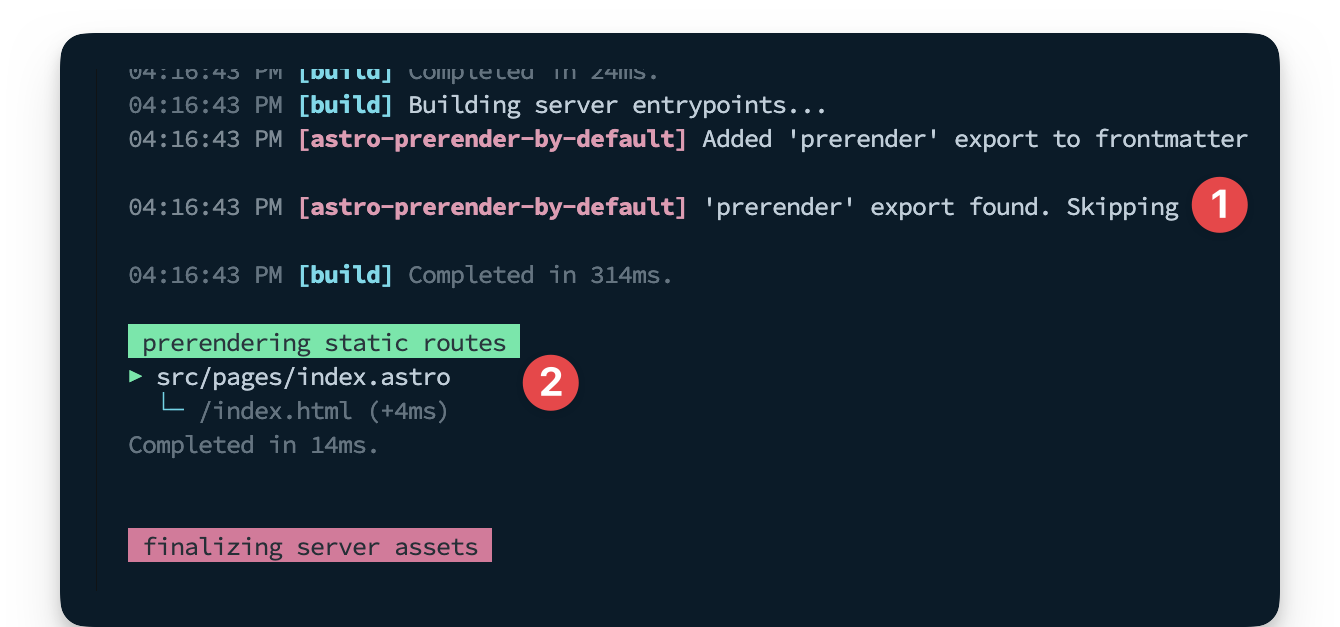
We have our solution complete. Now, let’s test it. First, build the project with npm run build, and even though we have a server output in the Astro config, we now have the index.astro page statically built by default!
To render a server-side page, we need to manually add export const prerender = false.
Create a new page with identical content as index.astro and have the prerender export.
export const prerender = false;
<html lang="en">  <head>    <meta charset="utf-8" />    <link rel="icon" type="image/svg+xml" href="/favicon.svg" />    <meta name="viewport" content="width=device-width" />    <meta name="generator" content={Astro.generator} />    <title>SSR</title>  </head>  <body>    <h1>SSR</h1>  </body></html>;
Now rerun the build and notice how only the index.astro page is pre-rendered.
Building renderers and library Integrations
As stated earlier in the chapter, the focus here is feature integrations. For building renderers and library integrations, I strongly recommend taking a look at the source code for popular integrations such as:
Most of these integrations are barely 100 lines of code at the core. Dig into them!
Conclusion
Building custom integrations isn’t a practice we should leave to the “smart” ones among us. Heck! Writing compilers isn’t a prerequisite! Building upon the explanations and examples discussed here, we’ve seen how mere mortals like us can reach down into the internals of Astro and bend it to our will. Now, put this knowledge to practice.
Footnotes
-
What is a sitemap? https://developers.google.com/search/docs/crawling-indexing/sitemaps/overview ↩
-
The injectSctipt option: https://docs.astro.build/en/reference/integrations-reference/#injectscript-option ↩
-
Colours in Javascript console (SO) https://stackoverflow.com/questions/7505623/colors-in-javascript-console ↩
-
Astro integration API: https://docs.astro.build/en/reference/integrations-reference/ ↩
-
The Vite configuration options https://vitejs.dev/config/ ↩
-
Transforming custom file types in Vite : https://vitejs.dev/guide/api-plugin.html#transforming-custom-file-types
The transform hook: https://rollupjs.org/plugin-development/#transform ↩